
Heat is the number one weather related killer in the United States, and most of the work that exposes workers to it happens in places where nobody is watching a forecast. The control that closes the gap is awareness, and awareness works best when the day’s conditions are posted where the crew already stops to drink.
A heat stress poster does that job. It turns the temperature and the humidity from something a supervisor asserts into something everyone can read for themselves, which is what ends the argument about whether today is bad enough to take an extra break. This page sets out the Heat Aware signs, where each one belongs, and how to choose between them.
In this article
Why a posted sign beats a briefing
A morning briefing is heard once, by whoever was standing there. A sign is read all day, by everybody, including the people who arrived late, the contractor crew nobody briefed, and the supervisor on the second shift.
It also changes the conversation. A crew that can see eighty percent humidity next to ninety four degrees stops debating whether the day is unusually hard, because the numbers say so. Heat index is what actually matters and it is the number people guess wrong, since sweat that cannot evaporate does not cool anybody. A sign that shows temperature and relative humidity together lets a worker place the day in the danger zones himself.
A posted sign is not a diagnosis tool and it is not a safety program on its own. What it does is set the expectation for the shift, so that heat exhaustion and heat stroke are being watched for from the start of the day rather than recognized after somebody goes down. The crew knows what kind of day it is, and so does everyone supervising them.
None of that is a substitute for a written heat stress management system. A sign does not prevent heat illness; water, rest, shade, acclimatization and supervisors who know what to look for do that. The sign is what keeps those habits in view.
Choosing between the two signs
Heat Aware makes two heat stress management system signs. They share the same purpose and differ in how the day’s range gets marked.
HSMS-01: the baseline sign
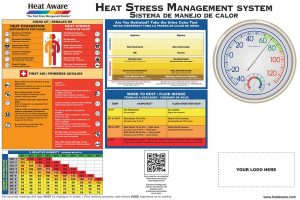 The HSMS-01 heat stress management system sign presents graphic cues to raise awareness of heat related illness, and carries a thermometer showing ambient temperature alongside the relative humidity, so a worker can see where the day falls in the Heat Index danger zones. Heat Aware states it is appropriate for any cool down area around a facility, inside or out, that it is available in two sizes, and that it is printed on HP vinyl, laminated and mounted on round cornered Max Metal with the customer’s logo printed on the sign.
Pick this one when the sign’s job is to inform, and the decision about breaks and work rest cycles already lives in a written program that supervisors follow.
HSMS-02: the sign that gets set each day
 The HSMS-02 sign with magnet heat index has everything the HSMS-01 has and adds four colored, labeled magnets used to set the heat stress range for the day. Heat Aware lists it in two sizes, HSMS-02-A at 42 by 28 inches and HSMS-02-B at 60 by 40 inches, in various materials suitable for hi-vis cool down areas inside or out.
Pick this one when you want somebody to physically set the day’s condition each morning. That small act is the value: a magnet being moved is a supervisor having looked, and a crew can tell at a glance whether anyone has.
Where to hang it, and the one mistake that ruins it
Put it where workers already stop
Put the sign where people already stop. The water station, the cool down area, the break trailer, the entrance to the hottest part of the plant. A sign on the wall of an office nobody enters is decoration.
Hang it in the shade
This is the mistake that ruins a sign. Heat Aware is explicit that the sign must be displayed in the shade to get an accurate thermometer reading, and this is the detail most often got wrong. A thermometer in direct sun reads far above air temperature. The sign then overstates the day, someone notices it disagrees with the forecast, and the crew learns to ignore it. One sign in the sun can undo the whole point of posting numbers at all.
One sign per hot area, not one per site
Two more placement notes worth the trouble. Hang it at reading height rather than high on a wall, because a sign people have to squint at does not get read. And if a site has more than one hot area, more than one sign is usually the right answer, since conditions inside a building and out on the deck are not the same day.
Keeping a sign working: replacement parts
A sign stops doing its job quietly. The thermometer fails, or the magnets walk off, and what is left on the wall is a poster with no live information on it. Nobody reports it, because it still looks like a sign.
Two parts are available on their own.
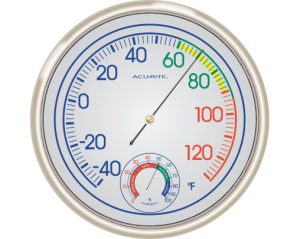 The replacement thermometer and hygrometer restores the temperature and humidity reading on a heat stress management system sign. It is the part that fails quietly, because a dead thermometer still looks like a working sign from across the room.
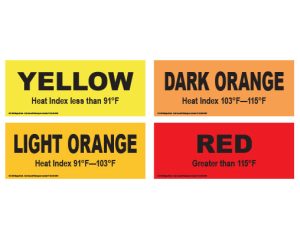 The replacement magnet index set replaces the four colored, labeled magnets used with the HSMS-02. Magnets walk off, and a sign missing the one that marks today’s range cannot do the job it was bought for.
Worth adding to a seasonal safety check: before the hot season, walk the site, read every sign against a handheld reading, and count the magnets. It takes ten minutes and it is the difference between a sign people trust and one they have stopped looking at.
Where signs sit alongside cards and decals
A sign is one control in a complete heat stress management system, and what it covers is the place rather than the person. It does not travel with the worker, and it is not there at the moment a crew member notices a colleague acting strangely. The awareness tools work in layers: the sign posts today’s conditions where the crew gathers, a Heat Aware Card carries the signs, symptoms and work rest reference in a wallet or behind a badge, and hard hat stickers for heat stress awareness keep one short message in view a hundred times a shift. None of the three replaces a supervisor spending ten minutes on the day’s conditions with the workers on shift, which is what turns posted information into changed behavior.
Sizes, logos and ordering
Both signs come in two sizes and carry the customer’s logo printed on the sign. Heat Aware states that custom designed signs take five to seven business days to produce after the proof is approved, and that out of town orders require crating to protect the signs in transit.
Most employers start with the areas where the workplace runs hottest and add coverage from there. Sizes, materials, artwork, volume and branded orders are all quoted directly. Email bryan@heataware.com or call 713-228-9331 with the number of areas you need to cover and whether the signs go inside, outside, or both. You can also see the signs, cards and decals together in the Heat Aware shop.
Frequently asked questions
What is the difference between the HSMS-01 and the HSMS-02?
Both signs carry the graphic cues and a thermometer with a relative humidity reading. The HSMS-02 adds four colored, labeled magnets that are used to set the heat stress range for the day, so somebody physically marks the current condition each morning. Choose the HSMS-02 when you want that daily act to happen and to be visible to the crew.
Where should a heat stress sign be installed?
Where crews already stop: the water station, the cool down area, the break trailer, or the entrance to the hottest part of the facility. It has to hang in the shade, because a thermometer in direct sun reads well above air temperature and a sign that disagrees with the real conditions stops being trusted.
Can the sign carry our company logo?
Yes. Heat Aware prints the customer’s logo on the sign, and both signs are available in two sizes. Artwork, materials and sizing are handled as part of the order, so send what you have and it gets built into the proof.
How many signs does one site need?
One per hot area rather than one per site. Conditions inside a building and outside on a deck are not the same, and a single sign at the office end of a plant tells the crews at the hot end nothing useful. Count the places people stop to drink and cool down, and cover each of them.
What do we do when the thermometer or the magnets stop working?
Both are available separately. The replacement thermometer and hygrometer restores the temperature and humidity reading, and the replacement magnet index set replaces the four colored magnets used with the HSMS-02. Checking both before the hot season is worth adding to a seasonal walkthrough.
Related pages
- What a heat stress management system includes. The program the signs, cards and stickers sit inside.
- HSMS-01 heat stress management system sign. The baseline sign, with a thermometer and humidity reading for cool down areas.
- HSMS-02 sign with magnet heat index. The same sign plus four magnets for setting the day’s range.
- Replacement thermometer and hygrometer. Restores a sign that has stopped reading.
- Replacement magnet index set. The four colored magnets for the HSMS-02.
- Hard hat stickers for heat stress awareness. The awareness layer that rides on the gear.
- Heat Aware Cards. The layer that travels in a worker’s pocket.
- Heat Aware product FAQ. Common questions across the product range.
Email bryan@heataware.com for pricing, availability, sizes, volume and custom or branded orders.